
If you want to maximize your CPU’s power, you’ll need to overclock it. One thing to consider is that when you overclock your CPU, you’ll be causing a higher level of heat production thanks to the added voltage required in the overclocking process.
There’s also the consideration that your power supply will need to work harder, producing higher voltage, to keep up with the CPU.
How Much Power Can You Expect to Add to Your CPU When Overclocking?

Overclocking a CPU is a delicate process, and every CPU is different when overclocking.
You’ll start to experience adverse performance issues when overclocking that may not be worth it, depending on your system.
For example, you may be able to push your CPU harder, causing a difference of 0.2 GHz in frequency, or you may be able to push the chip to produce 1 GHz more power.
At some point, more power is needed to power the CPU and all of the components will start to heat up. You’re pushing your CPU beyond its intended use, and there’s a threshold where some of the following can occur:
- Failure to boot (worst case scenario)
- Process corruption
- Drop in frame rates when gaming (GPU issue)
Related: how to increase FPS in games
Stability can become an issue, and this is due to small imperfections in the application in silicon lead and heat production.
In essence, you may get lucky with a chip, or you might not – there is no real way to tell. But there are a lot of processors that work better when overclocking than others.
What You’ll Need to Get Started with the Overclocking Process

Before getting started, you’ll need two main things that will allow you to properly overclock your CPU:
- Cooling. Components that get too hot will start to degrade. Not only will the components degrade, but they’re at a higher risk of failure. Your entire case’s cooling should be superb. A lot of people that overclock their CPU forget that the CPU is not the only thing that is suffering from excess heat. There’s also the hard drive, motherboard, graphics card and other components that need proper cooling. This is why having good quality components will help with overclocking.
- CPU. You should be searching online for CPUs that are the best for overclocking. Why? If you don’t and you’re building your rig from the ground up, you may be spending money on a CPU that performs poorly when overclocked. If you’re trying to overclock your current rig, you’ll probably want to keep your current CPU and research any issues that others are having.
Water cooling is ideal for all setups, but this is a costly expense. At the very least, you’ll want to purchase aftermarket cooling so that you keep all of the components as cool as possible.
Related: GPU temperature beginners guide
Now that you understand the basics, let’s get started with the overclocking process.
How to Overclock a CPU in 7 Quick Steps
Due to no two components being exactly the same, no two setups will be able to overclock exactly the same.
Even if all of the components are exactly the same, this doesn’t mean that all of the components have an equal level of stability.
And this is what you’ll want to check to start off with: CPU stability.
1. Get Started with Essential Software
You don’t want to try to overclock a CPU that is unstable to begin with. You’ll want to download a few pieces of software to get started:
Prime95 will be able to show you the CPU’s stability when the processor is idle and when the processor is at maximum load. Core Temp will be used to determine how hot your CPU is running.
Download and install both pieces of software.
You may want to check with your processor’s manufacturer to see if they have proprietary software for their products.
Motherboard manufacturers also have similar software that will be able to keep track of current temperature levels.
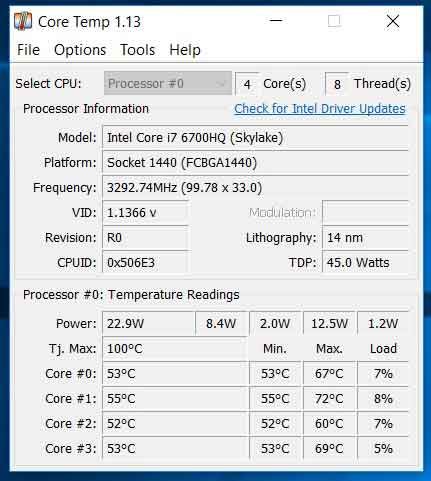
2. Check Current Processor Temperature Levels
Open up Core Temp and start monitoring your CPU’s temperature levels.
The manufacturer may list their running temperature, so if they do, check to make sure that the CPU is running within these maximum and minimum levels.
Monitor these levels under load to be able to have a better understanding of how your cooling system is working.
If your CPU is already running hot under load, you’ll want to invest in a new cooling system to be able to keep the CPU cool when overclocked. For example, here is our guide to CPU coolers for the i7-9700K.
3. Run Stress Tests with Prime95
Prime95 will allow you to see how your CPU runs and how cool it runs at 100% stress levels.
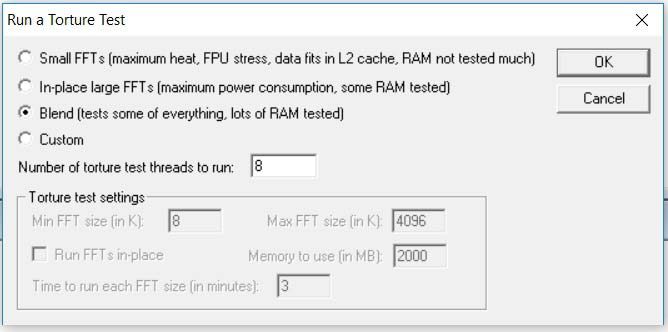
Open up Prime95, and navigate to the “just stress testing” setting. This will allow you to perform a variety of stress tests.
I suggest choosing “Blend Test” and running it.
You want to be able to test the stress on the CPU as a benchmark and will compare it later on to see how much stress the CPU is under when overclocked. You’ll be looking for tests that complete in safe temperature ranges.
4. Dive Into the BIOS
Restart your computer and pay attention when the computer is loading for the key to press to enter BIOS or SETUP. The key may be:
Your BIOS may be different than others depending on your motherboard, so you’ll want to look for something along the lines of:
- Overclock Settings
- CPU Tweaker
- OC Settings
If your system offers it, try and load “optimized CPU overclocking settings.” These settings are a great way to get started with overclocking.
Again, every BIOS is different depending on the manufacturer, so you’ll have to dig around to try and find auto overclocking settings.
Related: how to update gigabyte motherboard BIOS
The overclock options that are offered in a BIOS profile are the best option because you’ll be able to load overclock profiles that the manufacturer suggests.
AMD Ryzen processors make this easy with Ryzen Master which has all of the settings and temperature readings in one place.
Auto overclocking will allow you to test your system and really see how well overclocking is working. The only issue is that you’re limited by the preset profiles.
If you want to try pushing the CPU beyond these presets, you’ll need to do so manually.

5. Manually Changing BIOS for More Power
If you really want to overclock your CPU manually, you’ll be able to do so in the BIOS settings. This is done by adjusting the following:
You’ll need to adjust these settings for all cores. This is tricky, and it will depend on your current settings. If you’re running a 3.5 GHz processor, the CPU ratio multiplier will likely be 35. You’ll want to adjust this multiplier higher to be able to overclock the processor.
In this case, try and overclock the CPU to 3.8 GHz by changing the multiplier to 38.
Save all of your settings and then test out the load using Core Temp and Prime95.
6. Testing the CPU Stability at Maximum Load
You’ve changed all of your settings, so now it’s time to test the CPU under max load. Open up Core Temp for monitoring your CPU’s temperature and open Prime95 to stress test the CPU. Inside of Prime95, you’ll want to do the following:
- Navigate to Options
- Select Torture Test
- Select Blend Test
You’ll want to run the test for five minutes, monitoring the computer’s stability at this time.
In addition, you want to keep a very close eye on Core Temp readings to see how the unit’s cooling system is performing.
7. Maximizing Overclocking

The CPU has been overclocked, and you’re starting to see the power that your CPU really offers. If everything runs fine, you may be able to leave the settings. But if you want to push the limits, you can.
A quick way to do this is to increase the multiplier by one and repeating Step 6 again. You’ll do this until your stability and temperature suffers, or ideally, you get a Blue Screen of Death (BSOD).
If you do hit a BSOD or the CPU starts self-throttling, you’ll want to go back into your BIOS settings and find: CPU Vcore Voltage Mode and change the voltage by 0.01 volts each time. Afterward, save and restart to see if you can successfully boot the computer and run your stress test.
Every CPU responds differently to the voltage, but once you get a hang of it, you’ll really be able to push the limits of your CPU. There may be a point where you have to scale back your settings to reach stability, and this means:
- Reducing overclock by 0.1 GHz
- Reducing Vcore to a stable setting
Save and test. You’ll then, once you’ve hit this level, want to put your CPU to the real test using a long benchmark period.
Open up your Core Temp and Prime95 and test the CPU for an hour, three hours or even a day after you’re sure that temperatures aren’t dangerously high.
Related posts: