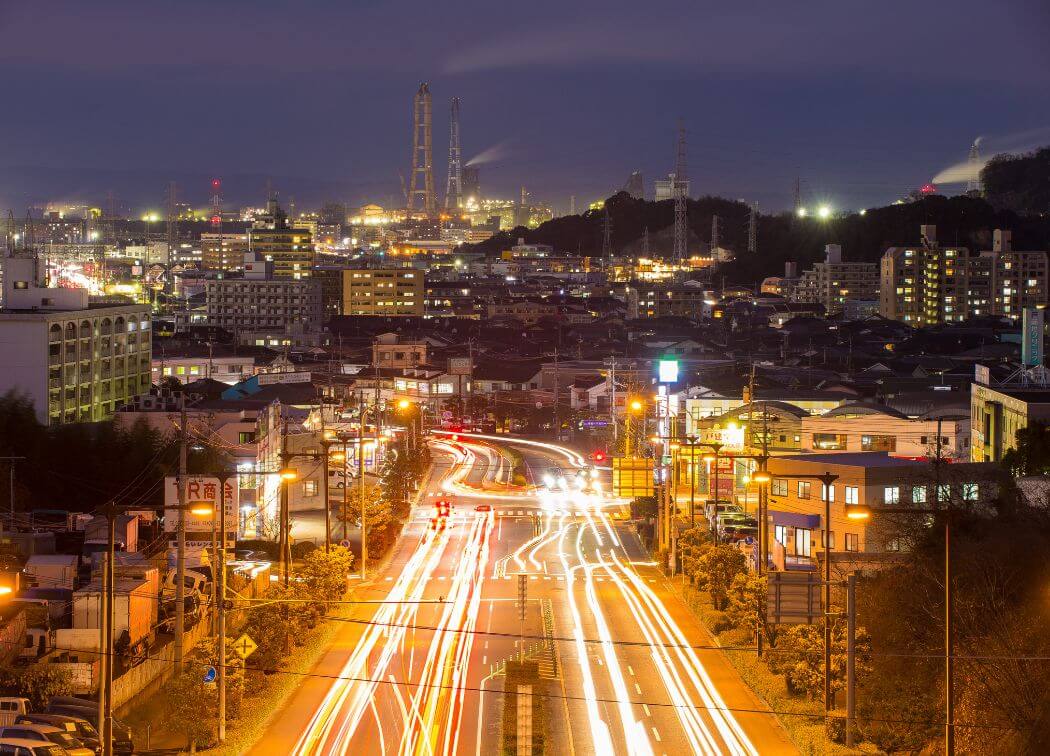
I assume you are here because you’ve seen photos like the one above and you want to know how to create amazing light trail photos of your own. Well it’s not difficult to do! In this post I will share the 7 best camera settings for car light trails that can help get you there. Also included are some bonus tips that add to the settings to really bring this concept home.
First a word about personal safety. When shooting light trails, you are going to be out in the dark, taking photos around moving vehicles near busy streets. Be sure to maintain good situational awareness.
Do not assume drivers will be able to see you. Wear bright clothing. Set up only in safe spots. Take a friend and have them look out for you. Come home after the photoshoot safe and sound!
Camera modes – Shoot in manual
This is a type of photography that requires you to have full control of your camera. You want to choose every setting. If you’ve shot in full manual before you will have no difficulty following these tips.
If you haven’t, just follow along and you will do fine. You might consider practicing finding these settings and adjusting them at home before you go out. This will help to make sure you know where everything is.
Shooting light trails is fun, and you don’t want to be fighting with your camera settings for car light trails out in the field.
How to Shoot Fantastic Light Trails?
1. Shutter Speed
Shutter speed should be between 5 and 15 seconds (although it can be longer). A car traveling 45 miles per hour goes about 120 yards is 5 seconds, or the length of a football field.
If the roadway has decent traffic you can get good trail capture at 5 seconds. If the traffic is lighter, then a longer shutter speed might be necessary. I recommend starting with 10 seconds and moving up or down as needed.
Also keep in mind that the longer the shutter is open, the brighter the exposure is going to be. If there is a lot of ambient light, then your photo will start to wash out at really long shutter speeds.
This is the setting where there is the most room for experimentation. Try several shots at different lengths until you get one you like. Shutter speed is the most flexible of the camera settings for car light trails.
2. Aperture (F/Stop)
The aperture should be set to at least F/8. If you need to increase your shutter speed but it starting to get a little over exposed, increasing aperture can help. You can increase the aperture to F/11 or higher to compensate for longer shutter speed.
There is an additional benefit you can get from aperture camera settings for car light trails. Using an aperture value of F/16 or higher will produce a nice starburst effect on stationary lights in your photo. As seen in the photo below.
3. ISO (Sensitivity)
When considering camera settings for car light trails, you want the ISO set to 100 or the lowest you can. Higher values make the sensor more sensitive, causing brighter exposures. This is not what you want for this type of photo. Keeping the ISO at its lowest value will allow you to use long shutter times without overexposing.
4. White Balance
When shooting after dark using long exposures, it’s easy for your white balance to get out of whack. Automotive headlights, streetlights, lights on businesses and other buildings all will produce a yellow cast to the photo. Therefore, one of the camera settings for car light trails you want to make is white balance.
Many people use Auto White Balance (AWB), however in night situations, the AWB detection can be thrown off a bit. Just set the White Balance manually to “Tungsten” or “Incandescent” or approx. 2500K
5. File Format
Using RAW as one of the camera settings for car light trails will allow for much greater flexibility later on. Should you need to make exposure or color corrections on the image, having it in RAW format will really help.
When an image is captured in a digital camera, it is recorded as raw data. If the camera format is set to JPEG, this raw data is processed and compressed before it is saved in the JPEG format. If the camera format is set to raw, no processing is applied, and therefore the file stores more tonal and color data.
Having said that, if you do not have the ability to edit files in RAW format, then of course use JPEG.
6. Lens Focal Length
Most light trails photos tend to be wide angle shots. Images that take in a lot of the background. This gives some size perspective to the light trails. There are times when one might use a longer focal length. Such as the inside the car shot shown below.
If you have a wide-angle lens, this would be the place to use it. If you have a zoom, use one of the lowest focal lengths available. My zoom lens is 24mm on the bottom end, which is amongst the best camera settings for car light trails.
7. Focus Mode
Autofocus usually has a tough time locking onto something in the dark. Plus, for this shot you are not really focusing on any particular object.
For me when it comes to focus mode, one of the best camera settings for car light trails is to switch it too manual focus. After that choose an object that’s roughly the same distance away as the passing cars will be and manually focus on that.
The other option is to just put the lens on infinity focus. The image below shows that focus distance window on most lens. Just line up the infinity focus mark and you are good to go. Anything close to you will not be in focus so keep that in mind when composing your shot.
Bonus tips
Here are a few additional things to consider when doing light trail photography
Light Trails Special Effects
Like the photo above, you can also set up your camera in a moving vehicle and get light trails from outside the vehicle. You’ll need to mount it on a tripod and probably have someone ride along to hold it.
All the camera settings for car light trails still apply to this method, which an exception. You’ll need to adjust your focus so that everything in the car is in focus rather than the stuff outside the car.
Time of day
Surprisingly, the best time of the day for light trails is just after sundown during twilight. This time of day gives you enough dark for trails, but enough light for significant background capture.
Photos tend to be more impactful if there is good background visual interest in addition to the primary subject.
Choosing a Location
From my experience, getting into a high location provides the best vantage point for capturing light trails. This allows you to see down onto roadways without surrounding terrain, buildings, etc. getting in the way. Overpass bridges are prefect for this.
The other option is to get down low near the roadway and shoot up toward the traffic. This is a harder shot. Finding the right location with a good perspective and a good background will take some looking around.
Light Tails Gear Essentials
A tripod is going to be an absolute must. You want the camera to remain rock solid for the entire length of the exposure. A regular sized sturdy tripod is all you need. Or, if you want to get a ground level shot, you can use a minipod to put the camera low to the ground.
A remote shutter release is also a must. You don’t want to be toughing the camera to initiate the shot on an exposure this long. Too much opportunity for camera shake. A simple wired remote shutter release will allow you to stand back from the camera and snap shots. Or if you prefer, a wireless release.
If you have a lens hood, you should use it. With the lens open for 10 plus seconds there is all sorts of opportunity for stray light to hit the front of the lens.
Here are a few gear options. These are affiliate links to Amazon. If you use one of these links to buy something, I gear a couple of coins as a referral fee. But it doesn’t cost you anything extra.
| Shutter Speed | 10 Seconds |
| Aperture | F/8 or higher |
| ISO | 100 or lowest |
| White Balance | Tungsten/Incandescent |
| File Format | Raw format preferred |
| Focal Length | 35mm or lower |
| Auto Focus | Set to manual |
Conclusion
Car light trails photos are pretty easy to capture. And they will look great and be really popular. Finding the right location is likely the hardest part of this type of photography. But it will be well worth the effort.
I hope you found these 7 best camera settings for car light trails and the additional information helpful. If so, please use the share buttons so more people can benefit. I hope you get some amazing photos!